
IK/FK BLENDING
OF course you can animate a stark switching between IK to FK by keying the the "IKblend" of the IK-handle's attribute, between 1 and 0. This will animated IK/FK wither ON or OFF. either one or the other, with no mixture of teh two at the same time.
BUT....you can have both IK/FK at the same time! using a "blend" of IK and FK technology. It involves a special "setIK/FK" key in "Animate"......but first, a formal description:
DESCRIPTION OF IK/FK BLENDING:
You can pose and animate the joints of a joint chain using both Fk and IK. This is called animation blending. This blending between FK and IK animation is possible because of the IK handle's Ik Blend attribute. Ik Blend lets you switch between posing and animating with pure FK or pure IK, as well as control the blend between the two kinds of animation. See Ik Blend.
Posing and animating a joint chain with both FK and IK changes the way the joints and bones are displayed in your scene view. A joint chain with FK and IK is drawn using three default or user defined colors. The dark-blue joint chain represents the skeleton with pure FK animation, the brown joint chain represents the skeleton with pure IK animation, and the magenta joint chain represents the resulting animation blend. Also, you can customize the colors of the IK/FK joint chains and the size of the IK/FK joints. See Set the display of IK/FK animated joint chains.
In addition to blending IK and FK animation over multiple frames, a blend can occur over a single frame. If you want to animate an instantaneous switch between IK and FK, such a planted, stationary hand quickly rising into the air, you should blend IK and FK over a single frame. Whereas if you want to animate a motion that eases in or out of IK or FK, such as a character jumping up to grab a horizontal bar, you should blend IK and FK over several frames. Blending IK and FK over several frames is also useful when you want the prevent jerking in your animation.
HOW TO DO IT:
Note
If you want to rotate or key individual joints in a joint chain that already have IK animation, turn on Ik Fk Control.
To create an animation blend from FK to IK
1. Select the IK handle of the Ik chain that you want
to animate with FK.
2. In the IK Solver Attributes, drag the Ik Blend slider from 1.0 to 0.000.
does the same as: "Skeleton>Disbable Selected IK"
The animation mode is now set to pure FK.
3. Select Animate > IK/FK Keys > Set IK/FK Key.
All the joints in the IK chain and the IK handle are keyed.
You will now be keying the joints (FK)—not the handle (IK).
4. Deselect the IK handle.
5. Select a joint in the IK chain, drag the current time indicator along the
Time Slider and rotate the joint.
6. Set a key.
7. Repeat steps 5 and 6 until you complete the FK portion of your animation.
8. Once you set the last FK key, deselect the current joint and select the IK
handle of your joint chain.
9. Make sure that the Ik Blend slider is still at 0.000 and select Animate >
IK/FK Keys > Set IK/FK Key.
10. Drag the current time indicator forward in time 1 frame.
11. Drag the Ik Blend slider to 1.000 and set a key.
Since there is no period of animation between the last pure FK key and the first pure IK key, the FK animation switches to IK instantly (without a blend).
The animation mode is now set to pure IK.
Note
When there is a period of animation between a pure FK key and a pure IK key, it is interpolated by the IK Solver. The interpolated animation then appears as Ik Blend values between 0.000 and 1.000.
12. Drag the current time indicator along the Time Slider, translate the IK handle and set keys as desired.
Example of IK/FK blending
Blending the FK animation of a swinging arm with the IK animation of a waving arm.
A simple animation of a swinging arm during a walk cycle is created by selecting the root of an arm's joint chain (the shoulder joint), rotating it along the Z axis, and then setting keys for the joint. This produces a rudimentary FK animation.
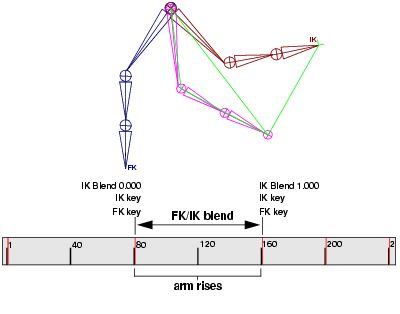
This FK animation sequence is blended with the directed motion of the arm waving by setting keys on the IK handle and the shoulder joint at the beginning and end of the FK animation, moving the current time indicator to create a blend region, changing the Ik Blend value to 1.000 (pure IK), and once again setting keys on the shoulder joint and IK handle. In the area between the pure FK and IK animation—the blend region, the IK Solver interpolates the animation from 0.000 to 1.000.
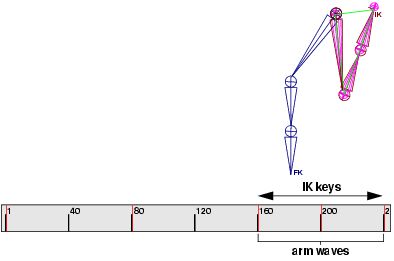
Pure IK animation is reached once the Ik Blend value is 1.000. The IK handle is then translated and rotated while setting keys, to produce the animation of the arm waving.
When the animation of the waving arm is complete, the animation is set back
(using another blend region and changing the Ik Blend value to 0.000) to pure
FK. The resulting animation resembles a swinging arm (FK) that rises into a
wave (IK) and then descends back into a swinging motion (return to FK).
To insert IK within FK animation (whether or not the FK is controlled by Set
IK/FK Key)
1. Open the Animation menu set (press F2).
2. At the first frame of the time range where you want to insert IK, select
the IK handle and set a key by selecting Animate > IK/FK Keys > Set IK/FK
Key.
3. At the end frame of the time range where you want to insert IK, select the
IK handle and set a key by selecting Animate > IK/FK Keys > Set IK/FK
Key.
We refer to the keys you set in the prior two steps as bounding keys, because they ensure that any keys you set between them will not change the animation outside their range.
4. Turn on Animate > IK/FK Keys > Enable IK Solver.
5. Manipulate the IK handle and use Set IK/FK Key as desired for the frames
between the bounding keys.
To insert FK within IK animation controlled by Set IK/FK Key
1. Open the Animation menu set (press F2).
2. At the first frame of the time range where you want to insert FK, select
the IK handle and set a key by selecting Animate > IK/FK Keys > Set IK/FK
Key.
3. At the last frame of the time range where you want to insert FK, select the
IK handle and set a key by selecting Animate > IK/FK Keys > Set IK/FK
Key.
We refer to the keys you set in the prior two steps as bounding keys. They ensure that any keys you set between them will not inadvertently change the animation outside of their range.
4. Turn off Animate > IK/FK Keys > Enable IK Solver.
5. Rotate the desired joints and use Set IK/FK Key as necessary for the frames
between the bounding keys.
To insert FK within IK animation not controlled by Set IK/FK Key
1. Open the Animation menu set (press F2).
2. At the first frame of the animation, select the IK handle, turn on Solver
Enable, and set a key for Solver Enable.
3. At the end frame of the time range where you want to insert FK, select the
IK handle and set a key by selecting Animate > IK/FK Keys > Set IK/FK
Key.
4. At the first frame of the time range where you want to insert FK, select
the IK handle and set a key by selecting Animate > IK/FK Keys > Set IK/FK
Key.
We refer to the keys you set in the prior two steps as bounding keys. They ensure that any keys you set between them will not inadvertently change the animation outside of their range.
5. Turn off Animate > IK/FK Keys > Enable IK Solver.
6. Rotate the desired joints and use Set IK/FK Key as necessary for the frames
between the bounding keys.
To eliminate unexpected joint flipping after turning on the IK Solver
After FK animation, a joint chain may flip to an undesired position when you turn on Animate > IK/FK Keys > Enable IK Solver. To undo the joint flipping and prevent it from occurring when you turn on Enable IK Solver, do the following:
1. Open the Animation menu set (press F2).
2. Undo the Enable IK Solver menu item to return the joint chain to the position
it had before flipping.
3. Select the IK handle.
4. Select Skeleton > Set Preferred Angle.
5. Select Animate > IK/FK Keys > Enable IK Solver.
6. Select Animate > IK/FK Keys > Set IK/FK Key.
Continue using IK as desired.