ART
480 Computer Graphics II (modeling in 3D)
SPRING
2011
CSULA
Professor
Jim Ovelmen
jim@jimovelmen.com
Jim.Ovelmen@calstatela.edu
|
LAB
HOURS (for
working labs outside of class)
 Check
this CAL button for all DUE DATES Check
this CAL button for all DUE DATES
Department
of Public Safety/Security 323-343-3700
jump
to COURSE OUTLINE...
week1, week2,
week3, week4, week5,
week6, week7, week8,
week9, week10, grading,
policies |
Office: |
FA 227 |
Office Hours: |
see front page of website |
Phone: |
Ext. 3-4033 |
Class Location |
Rm. FA 225, Art Department |
Term/Year |
SPRING 2011 |
Course Length |
10 weeks + finals week |
Meeting Time |
T/Th 10:50-1:20pm |
|
COURSE
DESCRIPTION |
This course introduces aspects and methods for achieving high-quality
3D models both organic and inorganic. Major emphasis of this class will
be put on the creative output of the student via the tools learned and
projects assigned. Moreover, the course aims toward the comprehensive
use of techniques in Maya to create meaningful 3D sculptures and environments
with expressive content. The class will be structured around increasingly
challenging projects around practical topics, and a final focusing on
the human head. Lectures will focus on the tools and principles of surface
construction as well as characteristics involving materials, textures,
lighting, and more. Related topics may include intro to rendering: HDRI
rendering, Final Gather, ambient occlusion, radiocity, and 2D rendering
techniques |
PREREQUISITES |
ART 380, Computer
Graphics I |
INSTRUCTIONAL
METHODS |
Class
lectures, in-class assignments, and project related demonstrations will
be provided from original or researched content. Supplemental homework
assignments, specific tutorials from published sources will be given.
Most of these assignments are, of course, to be done exclusively outside
the hours of class time.
The expecation is
3 to 6 hours per week working outside of class on project assignments
and homework. Lab hours will be posted.
There are numerous books and online tutorials on 3D modeling. I have
listed recommendations of texts and URLs for further study. I will also
distribute, handouts, images, and other reference materials to supplement
your studies.
|
TEXTBOOK
(s)
URL(s)
Assignments
may be given out of these selected items
|
BASIC
MODELING texturing, and lighting
Exploring
3D Modeling with Maya 7 , by P. Beckman and S. Wells Thompson
Delmar LearningISBN 1-4180-1612-8-
Learning
Maya 7, The Modeling & Animation Handbook,
Alias Systems Corp.ISBN: 1-894893-873-
Digital
Lighting and Rendering, by Jeremy Birn New Riders Press
ISBN: 0-321-31631-2
NOTE:
some links below might not work, please Google them
yourself if so
ANIMATION
TEXTS
-Timing
for Animation,
by Harold Whitaker and John Halas, Focal Press ISBN 0-240-51714-8
-The
Illusion of Life,
Disney Animation Walt Disney Productions ISBN 0-7868-6070-7
-The
Animator’s Reference Book
, Les Pardew & Ross WolfleyThompson Course Technology, USBN 1-59200-675-2
-The
Animators Survival Kit, by Richard Williams, Faber, ISBN 0-571-20228-4
-Cartoon
Animation, by Preston Blair, Walter Foster, ISBN 1-56010-084-2
-Understanding
Comics, Scott McCould, ISBN 0-06-097625-X
-Character
Animation in 3D, Steve
Roberts, Focal Press Visual Effects and Animation ISBN 0-240-51665-6
BRUSH-BASED
SCULPTING brush-displacement modeling techniques:
MUDBOX
and ZBRUSH: brush-based
displacement map sculpting (digital
clay)
|
|
| MUDBOX |
ZBRUSH |
brush
sculpting, super easy learning curve.
Runs on WINxp |
bursh sculpting,
more tools, z-spheres, more to learn. very powerful.
runs on PC and Mac. |
HEAD
AND BODY MODELING
|
|
|
|
|
|
|
| RYAN
KITTLESON's method |
JOAN
OF ARC tutorial: |
Another
Head Tutorial |
DIGITAL
TUTORS |
SPLINE
CAGE Method |
BOX
MODELING Method |
MODELING
THE EAR |
| simplified
poly cage construction, head only NOTE: does not cover
the ear. |
strategic poly
cage construction, head and body |
step by step
Polygon/SubD, with Acrobat files, and tutorial files |
strategic anatomically
correct construction, whole body |
using NURB
splines to form face |
Quicktime,
(also called "blocking") |
create Poly
and append tools used to make an ear |
ADVANCED
FACIAL MODELING FOR ANIMATION
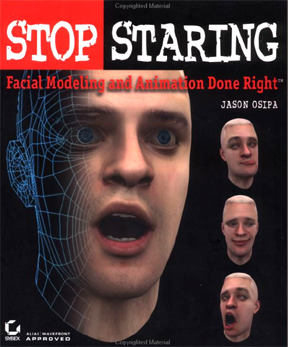
STOP
STARING
: Facial Modeling and Animation done Right,
by Jason Osipa
SURFACING:
NORMAL MAPPING:
Ben
Cloward, Cody
Sargent, BAAAAM!
tutorial,
Game-Artists.net
TEXTURES
some
texture
more
textures
MUDBOX:what
is Mudbox?
MudboxandMaya?,
MudboxBasicsAndWacomPen,
NORMALMAPSinMudbox,
MUDBOX_1of_4,
MUDBOX_2_of4,
MUDBOX_3_of_4,
MUDBOX_4_of_4,
RETOPPINGdetailinMUDBOX
3D
MODEL DATABASES:
http://www.meshfactory.com,
http://www.turbosquid.com,
http://www.3dcafe.com, http://www.linefour.com
ie:
McCainModel.zip, McCainMode.mb
PROFESSIONAL
CG SITES
http://highend3d.com
http://www.awn.com
www.cgchannel.com
Anzovin Setup Machine:
http://www.anzovin.com/products/tsm2maya.html
basic MEL and expressions:
basic MEL
|
|
OTHER
URLS
and
TEXTS |
click
for extended resources and links
click
for animation related texts (Word File) |
EDUCATIONAL
OUTCOMES
upon
completing this course the student should be able to: |
-be
able to think, plan and work creatively and comfortably with 3D modeling
tools, and display expressive choices and technical proficiency.
-apply industry
standard modeling techniques of correct quad-based topology
-posses a versatility
in different modeling strategies including Polygon, NURBS, and Subdivisional
-create high quality
texture maps with UV layout coordinates with precision on models
-create both high
quality inorganic and organic referenced models, including the ability
to create anatomical models based on reference which are "on-model".
-predict and build
the topology (muscle)flow for characters which anticipate future pipeline
events such as blend shape animation.
-obtain a comfort
with the node-based structure and inter-dependancy in Maya; and have
a strong knowledge of its context and workflow for creating models. |
PHYSICAL
SUPPLIES |
USB
Flash Drive (1 GIG
recommended)
External
Hard Drive, (mac formatted).
At least 80 gigs
Large Sketchbook,
graph paper, pencils, markers, and other drawing materials,
Sculpting material (optional)
may include: formable wire, clay or "sculpy" |
|
Maya
Basics
· Interface layout,
and logic (images here are not latest Maya
version):
grid,
interface, channel
box, attribute editor, commandline,
helpline, modules
, hotbox, layer
editor, manipulators, outliner,
panel layout, pivot,
quicklayout, shelf,
statusline, toolbox,
move tools, shortcuts,
·See through the
3D camera space and the orthogonal views.
· Cartesian properties
(xyz)
· Navigating around
the virtual world and camera control
· Manipulating objects.
(move, rotate, scale)
· Displaying object
wire, shadeModeling basics
· Primitive geometry
and pre-defined content
· Moving an object’s
pivot
· Polygon intro
· Selecting order,
and duplicationHierarchy
· Understanding
hierarchy, dependency and the workflow of Maya
· grouping, parenting,
and the Hypergraph
· Class Exercise:
Model and Navigate
· Class Exercise:
Create a Tree, Extrude face/edge of a box, Extrusion
on a curve
|
week1,
week2, week3, week4,
week5, week6, week7,
week8, week9, week10,
grading, policies
WEEK 2
Modeling Tools and Geometry


|
Modeling
basics (cont.)
· Object and component
mode
· Manipulating polygon
surface components (vertex, edge, face)
· Extruding a face,
edge, etc. (keep faces together, or not)
· NURBS objects
and their components (hulls, lines, CVs)
· NURBS and Polygon
comparison, show tesselation differences.
· Trimming NURBS,
and use of Make Live
· Pick masks: prioritizing
and masking· The Outliner:
· Drawing and manipulating
NURBS curves
· Using simple curves
to create custom objects (extrude, loft, etc)Rendering Basics
· Lighting intro
(point, directional, spotlight, etc)
lighting explained
tpyes
of lighting
low
key/high key
three
point lighting
shader
examples
· Hypershade and
Shading intro
|
week1,
week2, week3, week4,
week5, week6, week7,
week8, week9, week10,
grading, policies
WEEK 3
|
MIDTERM
PROJECT : VIRTUAL MOBILE is assigned
DUE:
Tuesday, MAY 3rd
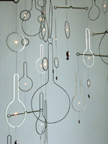 (image
on left, for definition purposes only) (image
on left, for definition purposes only)
mo·bile
a piece of kinetic sculpture having delicately
balanced units constructed of rods and sheets of metal or other material
suspended in midair by wire or twine so that the individual parts
can move independently, as when stirred by a breeze.Compare to stabile.
I
want you to start with a collection of FOUND OBJECTS, model them individually,
then desgin them into a virtual hanging mobile sculpture. You can
use lights if you wish to create a chandelier-like piece as well,
it's up to you. Moreover, in the tradition of Alexander Calder, create
a piece that looks like it could actually balance itself in gravity.
(more info
on kinetic sculpture)
found
objects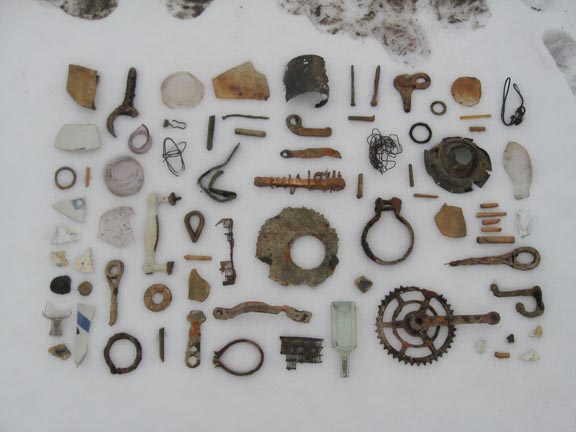
HERE ARE THE STEPS FOR THIS
PROJECT
1) Spend at least
one full day collecting small objects..you could go on a
nature walk and collect leaves, rocks, stones, bark, pine or seedling
cones, shells, broad grass samples, etc. Then you could go and search
for junk items, metal, wood, simple toys, harwares, stuff in a junk
drawer...
..all items you can fit
easily into your hand...make sure you have a large amount of diversity
of items. You may if you want collect any manmade items, dicarded
or trashed, but again, only if it looks completely safe, and permitted.
DO NOT go to anyplace dangerous,
CSULA holds no liability.
2) Collect
all a wide variety of portable found items, that you can put in a
bag and bring back to lab or home to begin to make organic models.
3) choose
at least eight of the most interesting forms among the object and
make sketches of them in front and side views. Take these drawings
and scan them into Maya and use as building plans for you model.
4) You
may also DIRECTLY SCAN some of the flat surface and texture of your
object. You are to not only to model these objects as faithfully as
possible, you will contribute color, bump, tranparency, and any other
texture maps needed to give full richest and similitude to your objects.
Using efficient quad-polygon and/or NURBs techniques, you are expected
to make professinal level models as well as believable textures and
High quality lighting. (using global illumination
/ mental ray)
5) After
all eight of you objects are modeled and textured, you are to arrange
these mutiple objects into a MOBILE, or VIRTUAL HANGING SCULPTURE
that connects all the peices together. you can incorporate lights
as well to make you piece like a chandelier or any creative interpretation
Your project can have a
social message as well if you wish, warning against overconsuption,
but the content, message, and the creativity is up to
you.
6) SPECS:
this project (following the file tree below)
as instructed, and render at least 3 different views, at a resolution
size of at least 3K each.
Modeling and Materials
· Intro to 3D typology:
Further surface construction via curves to create NURBS surfaces
· shading and lighting
continued: materials, different types of lights, and aspects of surface
appearance.
· Lighting and the
properties of rendering, tesselation, raytracing. Depthmap and raytraced
shadows. Emulating realistic lighting without using Raytracing.
· More Poly tools:
split polygon, split edge ring, cut faces, merging, etc.
· Polygons, Collapse
edges, Merging Verticies
· Subdivision modeling·
Polys to subD conversions
· New features since
2008: when you hit 1,2,3 on a selected polygon, acts like a SubD.
· Materials further:
2D and 3D textures
· texture maps further:
color, bump, displace, transparency, etc.
HOMEWORK:
modeling and lighting a variety of simple forms.
other
assigments similar to this one |
week1,
week2, week3, week4,
week5, week6, week7,
week8, week9, week10,
grading, policies
WEEK 4
Super
Fast 3DAnim Overview

|
UV texture creation
and placement
Laying
out UVs on polygon figure
· Box modeling techniques:
begin with half of a Poly cube (open).
· Outputting UV
maps· Mapping methods for geometryPaint EffectsCamera Properties
box
modeling, (subdiv Proxy) instance setup
· Box model a basic
head, using edge loops, and Instance duplicate; upon finish Mirror
Geometry and merge both parts. (all edge verts. flush to the "0"
line, before mirror,) (trans tools settings set to WORLD, retain component
spacing OFF, discreet move OFF)
· Basic approaches
to customized Photoshop textures for Polygonal Models
· Film format/aspect
ratio, composing the camera
· Film format/aspect
ratio, composing the camera· Changing lenses, focal length,
and Action Safe/Title safe areas· Depth of field
· basic projection/normal
mapping, 2D/3D placement node. 2D/3D map descriptions
|
week1,
week2, week3, week4,
week5, week6, week7,
week8, week9, week10,
grading, policies
WEEK 5
|
MIDTERM PROJECT
(Virtual Mobile) is DUE (Tues, May 3rd)
Other modeling methods:
Duplicate Special
for quick complexity, but be careful..
  
bump/displacement
mapping

normal
mapping:
Ben
Cloward, Cody
Sargent, BAAAAM!
tutorial,Game-Artists.net
MUDBOX and NORMAL
MAPPING: what
is Mudbox?
MudboxandMaya?,
MudboxBasicsAndWacomPen,
NORMALMAPSinMudbox,
MUDBOX_1of_4,
MUDBOX_2_of4,
MUDBOX_3_of_4,
MUDBOX_4_of_4,
RETOPPINGdetailinMUDBOX
TEXTURES
some
texture
more
textures
-in Animation Menu, try
using Deformers
-Animation>Deform>Non-Linear
Deformers: bend, flare, sine, squash, twist, wave, etc.
-----------------------------------------------------------------
use front/side/top view
images for accuracy, i.e:
 
revisiting TEXTURES
and their placement:
-Projection, Normal, Procedural:
a 2D or 3D placement node is created.
-the variety of maps you
can create: color, transparency, bump, displacement, diffuse, specular,
incandescent, normal map, and on and on..
|
week1,
week2, week3, week4,
week5, week6, week7,
week8, week9, week10,
grading, policies
WEEK 6
Special Topics Visited
|
FINAL
PROJECT : SELF PORTRAIT / ALTER EGO is assigned
DUE:
on Finals Day
-More on UV texture mapping,
redo the demo once again of facial layout.
· Lighting: realistic
sources, multiple sources, soft shadows
· Raytracing, reflection,
and refraction· Qualities of light, mental ray materials and
photons: Cuastics
· Basic Special Effects
on surfaces, Paint Effects, particles,
· more on Box Modeling,
modeling to reference.
· basic demo of the
"Soft Modification Tool"
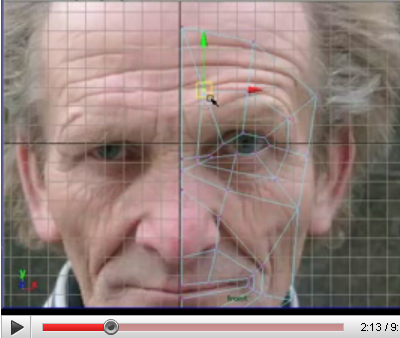
· importing and using
image planes for reference
· setting up and using
refererence, the importants of good flat reference, good line-art often
is the most useful, ie: line art example,
but you can use photos too if you manipulate them well in PS.
· setting up "plumb
lines" of the front and side view in Photoshop in a layer.
Or, if you draw or trace your image, use Graph Paper.
· basic intro to "Poly-to-Poly"
modeling method, using front and side reference, · Point
layout
· Organic Modeling
Concepts: Muscle Flow, Uniformity, Quad
Topology
· Customize your Marking
Menu
· UV Texture Editor,
very basic intro
· Simple demo of painting
a face in Photoshop to follow UVoutput.
· Use of Photoshop
in texture map creation, import UVout into a layer in PS, painting on
above layers with less% of Fill.
-Modeling demo, starting
again with Poly-toPoly sconstruction of the eye, building in edge rings,
showing strategy of point layout
-converting the eyes and
surrounds to SudDiv, using tools to sculpt, and back to Polys again,
(make sure to set to "Verts" in conversion Options)
-benefits in modeling in
SudDivs,: slect edge(s) under eye, and inset crease (SubdivSurf>full
crease edge)
-show kinds of errors one
can get with converting Polys to SubDivs: what are nonmanifold geometry?
and lamina faces? you can correct these in Mesh>Polygon Cleanup
-show the usefulness of Mesh>Sculpt
Geometry Tool (works with Poly or SubDivs)
-show the SOFT MODIFICATION,
red feedack shows influence: *also in: Modify>Transformation Tools>Soft
Modification Tool, OR, Animation>Deform>Soft Modification
· Building a Face
(Poly-to-Poly method), online
tutorial
· Building a Face
(another step by step), tutorial
· point layout with
Z-brush 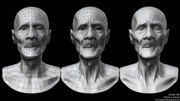
· Making Normals Soft
or Hard: Edit Polygons>Normals>Soften/Harden*
*also can "conform"
Normals if the are not homogenous
· Ear
layout, Ear
Model Tutorial, Modeling
a Hand
FINAL PROJECT
is
assigned: CREATE A 3D MODEL OF YOUR OWN HEAD..
create a 3D head closely based on photo-references to match as closely
as possible to refererce. They modify the head, style, look, or appearance
of the head that provides an alter-ego or a much different yet perhaps
hidden side of yourself. (due Finals Week)Proposal and sketches for
FINAL PROJECT assigned (due Week 6) |
week1,
week2, week3, week4,
week5, week6, week7,
week8, week9, week10,
grading, policies
WEEK 7
Special Topics Visited
|
Look
Over Midterm Projects, Class Critique
BELOW
IS THE CRITERIA FOR THE Final Project
1)The
standard and quality of model, textures, lighting must be very high
(matching the most rigorous evaluation grading cirteria (in blue below)
the "head" must have proper topology, and UV texutre maps
of color, bump, specularity maps, etc, where necessary.
2)The
film should reflect a SINCERE ATTEMPT BY THE STUDENT TO COMMUNICATE
an imaginative new identity(potential)through the model, whether that
be a specialized object, environment, world or character.
3)The
piece must have an idea of what target viewer, group, or audience would
this piece be produced for.
4)You
must have at least FOUR, 3K renders of your final model, with high-end
texture, lighting, etc. UV texture mapping is expected on at least one
or more of your surfaces. Either realistic or specialized lighting is
expected in your scene which clearly defines a strategic lighting situation.
5)You
must show efficient level of modeling skill in Polygon, NURBS and/or
SubDs
6)The
model should give the impression of STYLE, a graphic or aesthetic strategy
used by the artist. The design/sketch approval phase will dictate
most of this.
7)You
must follow the file tree specifications when turning in all of the
Final Project Content
----------------------------------------------------------------------
this special topic will
by demonstrated for interested students
· Caustics and Global
Illumination · mental ray lights
· Proposal
and sketches for FINAL PROJECT are due |
week1,
week2, week3, week4,
week5, week6, week7,
week8, week9, week10,
grading, policies
WEEK 8
Special Topics Visited
|
this special topic
will by demonstrated for interested students:
· NURBS patch modeling
(facial model), direct conversion to SubD’s
image lighting, ambient occlussion,
mental ray
HDRshop
shader
examples |
week1,
week2, week3, week4,
week5, week6, week7,
week8, week9, week10,
grading, policies
WEEK 9
Special Topics Visited
|
this special topic
will by demonstrated for interested students:
· Toon Shaders, Ramp
Shaders, vector Renders, and otherwise 2D-shaders
· Basic Character
Rigging: getting your model into different poses |
week1,
week2, week3, week4,
week5, week6, week7,
week8, week9, week10,
grading, policies
WEEK 10
Special Topics Visited
|
· Consultation on
last leg of production: proper format, media, specs and content delivery
FINAL PROJECT
to be completed and turned in on designated due date on Finals Day of
the 11th week. Student presentations will be prepared for Finals, where
classmate critique and discussion will end the course. |